Lately it has been a real sewing spree around here. I have had some really nice times of getting together with friends to quilt!
It's fun to start a couple of new projects just to try out a new technique, or to use a group of fabrics that I love.
At the same time, I've been sewing a few samples for the store, and the quilt below is one of them. It will be a new pattern that starts with a Jelly roll (forty 2-1/2" strips).
I wanted to start quilting it last night, but I'd forgotten to get a backing while I was at the store. So I rummaged around in my sewing room and found a nice piece of soft red cotton velvet.
It is a bit heavier than a regular cotton backing, but I thought why not give it a try? I didn't quilt it very closely, just a diagonal grid of wavy lines. I hope to stitch the binding later today.
And this afternoon I also sewed the #12 Sampler Blocks:
I always intend to work ahead, but that never seems to happen.
Wednesday, February 16, 2011
Sunday, February 6, 2011
Quilting and Basting, or Bastng and Quilting
I do put pins in to baste, Monika,...
Actually, I spent a couple of hours this morning basting,
As you might guess, I do this on the floor of my sewing room. I smooth out the backing and tape it down to the floor, with the "wrong side" up. Then, I smooth the batting over it, then the quilt top.
After that I spill out a bunch of safety pins and sit cross-legged on the floor, and then on the quilt, as I put them in, starting at one end and working my way to the other end. As you can see, I don't put them too close together, maybe 6 inches apart.
When I start quilting, I often do "In the ditch" alongside the borders, or any long pieces like that.
Then, I go all around the outside of the quilt and trim off the extra batting and backing fabric.
I do that because so often I've accidentally gotten the extra backing folded over and quilted onto the back of the quilt, and have had to unpick all that.
So, then I often take out the pins that are close to the straight stitch quilting. I like to take pins out. I don't like when they click on stuff. I also don't like to stop in the midst of free motion quilting to remove a pin, so I usually try to maneuver around them, and then take out a whole bunch of them at the same time.
Also, I don't tend to start at the middle and work out. Instead, I seem to start at one side and do 4 or 5 " passes from the top to the bottom, moving from the right side toward the center of the quilt.
I haven't had too much bad luck doing it this way, although I probably do get the backing bunching up a little from time to time. But, that's just what I am able to do, which isn't perfect, but it's do-able.
And, I am happy that I was able to take some quilt tops to a long-arm quilter to do this past week. And! I have a few more ready to take as well. There are still a couple of tops that need backings and borders, but the stack is much depleted.
I had a few smaller projects, like the Christmas one I did yesterday that don't exactly make me really excited to finish, but I am trying hard to feel enthusiastic about them. There was some sort of reason why I started those projects, and if I do finish them, then it is possible that they can be used and liked by someone, if not necessarily by me.
Oh yeah, I do have a "tip" that I thought of when I read "your" (Monika's) post last week on bindings.
This is: As soon as I finish the quilt top, I cut the binding for the quilt. Then I have a special container where I place the bindings so that they don't get mixed up with my other fabric and accidentally used for something else.
Actually, I spent a couple of hours this morning basting,
As you might guess, I do this on the floor of my sewing room. I smooth out the backing and tape it down to the floor, with the "wrong side" up. Then, I smooth the batting over it, then the quilt top.
After that I spill out a bunch of safety pins and sit cross-legged on the floor, and then on the quilt, as I put them in, starting at one end and working my way to the other end. As you can see, I don't put them too close together, maybe 6 inches apart.
When I start quilting, I often do "In the ditch" alongside the borders, or any long pieces like that.
Then, I go all around the outside of the quilt and trim off the extra batting and backing fabric.
I do that because so often I've accidentally gotten the extra backing folded over and quilted onto the back of the quilt, and have had to unpick all that.
So, then I often take out the pins that are close to the straight stitch quilting. I like to take pins out. I don't like when they click on stuff. I also don't like to stop in the midst of free motion quilting to remove a pin, so I usually try to maneuver around them, and then take out a whole bunch of them at the same time.
Also, I don't tend to start at the middle and work out. Instead, I seem to start at one side and do 4 or 5 " passes from the top to the bottom, moving from the right side toward the center of the quilt.
I haven't had too much bad luck doing it this way, although I probably do get the backing bunching up a little from time to time. But, that's just what I am able to do, which isn't perfect, but it's do-able.
And, I am happy that I was able to take some quilt tops to a long-arm quilter to do this past week. And! I have a few more ready to take as well. There are still a couple of tops that need backings and borders, but the stack is much depleted.
I had a few smaller projects, like the Christmas one I did yesterday that don't exactly make me really excited to finish, but I am trying hard to feel enthusiastic about them. There was some sort of reason why I started those projects, and if I do finish them, then it is possible that they can be used and liked by someone, if not necessarily by me.
Oh yeah, I do have a "tip" that I thought of when I read "your" (Monika's) post last week on bindings.
This is: As soon as I finish the quilt top, I cut the binding for the quilt. Then I have a special container where I place the bindings so that they don't get mixed up with my other fabric and accidentally used for something else.
Saturday, February 5, 2011
Today is a nice Saturday, not too cold, and every so often, more snow flutters past the window.
I am trying to do some machine quilting!
It is a quilt top that uses a panel by Thimbleberries, surrounded by quite a few borders, that we had a couple years ago at the shop.
I thought the borders would be a good place to practice some free motion motifs-- so far I did a loopy thing in the green, and some leaves in the yellow part. Maybe I'll do a feathered something in the red parts,.. hmm.
I am trying to do some machine quilting!
It is a quilt top that uses a panel by Thimbleberries, surrounded by quite a few borders, that we had a couple years ago at the shop.
I thought the borders would be a good place to practice some free motion motifs-- so far I did a loopy thing in the green, and some leaves in the yellow part. Maybe I'll do a feathered something in the red parts,.. hmm.
Thursday, February 3, 2011
Concerning the Hand Warmers, Heidi
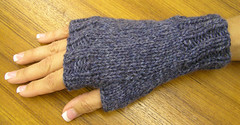
Well, this is what I know about the fingerless mittens/gloves.
I have knit 3 pairs now, all on 4.5mm needles.
This is the latest pair.
They are a really nice yarn, containing cashmere, which is very nice next to the skin.
I used a pattern by "Ella Rae" in a book I have, but can't quite find at the moment, but is was a pretty easy pattern. I just varied it for different cuffs and hand edges.
I did a quick search on Ravelry (if you are a knitter and don't know about Ravelry, well, that's something you'll want to remedy right away!!!) and found a couple of patterns that are pretty close. Unfortuneately, there are all sorts of other patterns that look like a lot of fun!! Cables!
This one is a free pattern by Knitting at Knoon
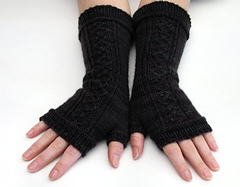
and you can find the pattern for the ones below here
Look at these!!!, by Eunny Jang, on ravelry
and these, by Erica Lomax: (more free downloads!!!)
What a lot of fun!!
Good thing that I've been finding new homes for some of the ones I made already -- the orange ribbed ones and a couple pairs of the recycled sweaters! Hope they do their job. I'm enjoying the grey ones!
I have knit 3 pairs now, all on 4.5mm needles.
This is the latest pair.
They are a really nice yarn, containing cashmere, which is very nice next to the skin.
I used a pattern by "Ella Rae" in a book I have, but can't quite find at the moment, but is was a pretty easy pattern. I just varied it for different cuffs and hand edges.
I did a quick search on Ravelry (if you are a knitter and don't know about Ravelry, well, that's something you'll want to remedy right away!!!) and found a couple of patterns that are pretty close. Unfortuneately, there are all sorts of other patterns that look like a lot of fun!! Cables!
This one is a free pattern by Knitting at Knoon
and you can find the pattern for the ones below here
Look at these!!!, by Eunny Jang, on ravelry
and these, by Erica Lomax: (more free downloads!!!)
What a lot of fun!!
Good thing that I've been finding new homes for some of the ones I made already -- the orange ribbed ones and a couple pairs of the recycled sweaters! Hope they do their job. I'm enjoying the grey ones!
Tuesday, February 1, 2011
Concerning the Interesting Reflection of Fabrics to the Real World
Well, further to yesterdays comment on the colors in the quilt photo being similar to what's outside right now-- another unplanned correlation:
Yesterday I had recorded the beautiful-ness of these strawberries. I liked the green tops on them, they weren't all dried up, but nice and fresh looking. (Also note the brown background of the table)
Later, at the shop, Jen was putting together a new kit with the Fabrics from French General. Of course I have to sew this sample,(it has adorable blocks of alphabet samplers)
And lo, and behold, there on the cutting mat (green) are the strawberry colors looking back at me. Red, Brown, Green, and white(ecru).
Aside from that, I have been recently working on this table runner, made from pieces of re-cycled shrunken sweaters.
My friend Linda has done whole throws using this method, which I learned from her. The pieces are butted up against each other and zig-zagged together. But the key is to first iron on a little 1/2" strip of fusible interfacing to the back of the join. I have yet to add a backing and "binding", which has not yet been worked out how to do that.
Yesterday I had recorded the beautiful-ness of these strawberries. I liked the green tops on them, they weren't all dried up, but nice and fresh looking. (Also note the brown background of the table)
Later, at the shop, Jen was putting together a new kit with the Fabrics from French General. Of course I have to sew this sample,(it has adorable blocks of alphabet samplers)
And lo, and behold, there on the cutting mat (green) are the strawberry colors looking back at me. Red, Brown, Green, and white(ecru).
| 2 of the 8 alphabets |
Aside from that, I have been recently working on this table runner, made from pieces of re-cycled shrunken sweaters.
My friend Linda has done whole throws using this method, which I learned from her. The pieces are butted up against each other and zig-zagged together. But the key is to first iron on a little 1/2" strip of fusible interfacing to the back of the join. I have yet to add a backing and "binding", which has not yet been worked out how to do that.
Subscribe to:
Posts (Atom)
print friendly
Recent topics;
-
Because I've been in Savannah lately, Nancy has been emailing me photos of the new fabrics thathave been arriving. This week we got an...
-
If you haven't entered already, be sure to enter the giveaway for 5 fat quarters, which we will do the drawing for on Wednesday, May 2...
-
A giveaway draw is something that I haven't done on this blog before, although I have seen it done by others. However, a few months ago...
-
I had to drop my car off to get some work done so Richard came along and we're hanging out at a neighborhood coffee shop for a while. T...
-
I was elated when I saw the quilting Patti did on my Salt Water Shoreline quilt. She did a squared spiral on the diagonal all over the t...