Pages

Showing posts with label Saturday Surprise Sampler. Show all posts

Monday, September 14, 2015

Sampler Quilts and Show and Tell

do these look familiar? They are Jo Morton colorway blocks from last years Saturday surprise sampler.
it's that time of year when I'm looking forward to the show and tell to see what people have done with their blocks from last time!   It is on Saturday at the store at 10 AM, if you are in town and want to pop in and get some inspiration.
I had quite a few blocks from sewing up the prototypes. I have one large quilt sewn together, but I also had a lot of six-inch segments leftover after it was sewn.
Each of the blocks were designed so that you could use it as one 12 inch block or as four 6-inch blocks.
today I'm working on a smaller sampler that uses the 6 inch blocks.
(sorry if the photos are a little blurry, I'm taking them on my iPad and noticed that I'm a little wobbly today.)
I used 35 blocks and sewed 1 inch frame around each of them. Then I sewed them into a horizontal grid of five columns and seven rows.
I have a lot of scraps left over from when I was making up the patterns so I decided to add a pieced border around the edges.
I recently designed a row pattern that had a braid segment, so a braid border was on the top of my mind.
I started with 4 1/2 in. square that will finish at 4 inches when sewn into the quilt.  
then, The side rectangles are cut  at 1.5" x 5"... each braid needs two of these...
then you add two more rectangles, cut at 1.5" x 6" long.
i'll just keep adding sections to the braid sections until they are long enough for the top and side borders. I think I'll have to also add a plain border in between the center and the borders.
(of course, the edges of the borders are trimmed straight before sewing them onto the quilt)

i'm not sure if I'll have this top together before Saturday, since something exciting should be happening in my life tomorrow, but I'll take what I have to the show and tell on Saturday.

I hope to see you at the show and tell at Periwinkle in Saskatoon at 912 Broadway Avenue at 10 AM whether you have blocks to show, or a quilt top,  to show from last year or not. We will also have refreshments!

The show And tell  will be on the main level of the store, so you don't need to navigate the staircase. Also remember there is a parking lot at the back of the store. See you then!

Thursday, September 3, 2015

the PROM

Finally, finally, I came up with the final format of our new Block of the month program!
it can be quite time-consuming trying to figure out all the little details of how to start something new.
however, autumn Kept getting closer and closer and so I had to make some decisions. 
For the past several years we've had a program called the Saturday Surprise Sampler,  and while it was a really good program, I was getting weary of designing 12 inch blocks.  Plus, I think we all have at least one or two (or three or four....) sets of blocks that we have yet to so into a big quilt.  so anyway here are the details of the new program.
it is called the project of the month. That is the PROM for short.
This is how it works....
  • Each kit includes the fabric and pattern for a pieced row.   The size is right to use as is for a table runner, or you can incorporate it into another project. The fabric in the kit will be the equivalent of at least 1.5m,  (so even if you don't end up sewing the project, you will have a cute little bundle of co-ordinated fabric! )  The pattern is quite detailed, with lots of diagrams.  It will also include an idea or two on how else you could modify or use the design.
  • A new kit will be released at the beginning of each month.
  • You can pick up a kit at the shop, or we can mail them out to you.
  • There are two color options:
  • 1.  "Serenity":  the colorway will be consistent through the months.  It is a combination of light blues, light turquoise, lavender,  grey and soft white.  You can later combine the rows into a larger quilt

2.. a different fabric grouping each month.  For this option, we will make the kit up with a new arrival of fabrics.  The colors for each month will change.    For the first month, I chose Country Orchard by Blackbird Designs for Moda, 

 Number of Kits: 6 (buy as many or as few as you like)
Size of Quilt: variable  (the first project worked out to be about 18" x 51" (or 56", depending on how you add borders)
Cost per Kit:
  • $28.00 when you buy in store, $29.00 by mail order.
  • Buy as few or as many kits as you like. If you pre-pay for 5 kits, you will get number 6 for free! (I think this is a good deal!)
  • Sign-up is required only for mail order, otherwise just come in and pick up a kit. If you want to receive blocks by mail order, you can call the shop anytime! (306) 933-3072
Pickup / Mailing Dates:
September  5  (I know this is over the long weekend, but the next weekend is the Broadway Street Fair, and the next weekend is too far away!)
October 3
November 7
December 5
January 9
February 6

Well, I have both the colorway tops sewn, and I hope to get at least one of them quilted by Saturday, but who can say what might happen.   
I hope that this will be a fun project for you to do, especially if you are out of town.  We've had a group of people who have done several of the Saturday Surprise blocks, and I hope that this will be a good package to get in the mail each month!
If you have any comments or suggestions, please let me know!!! you can send me a message by email at peri@sasktel.net, or in the comment box below,   Michelle


Wednesday, February 25, 2015

Medallion

I sewed a medallion to use as the center of my Saturday Surprise Sampler for this year, using the Jo Morton fabrics.

The fabrics are in the style of 1800's fabrics, and that was a time when Medallion quilts were popular, so it seemed only fitting to use the blocks this year for that style of quilt.
I had made a medallion quilt about ten years ago that I pulled out and laid the blocks around to get an idea of how it might look, and liked it well enough to repeat,
so this is how it looks so far, 
If you are interested in using this as the center for your quilt, if you are doing the blocks this year, I have written the pattern for it, and we have even cut some kits for it, 
the kits came out at a regular price of $55.50, as they contain just over three meters of fabric and the pattern.  If you have purchased at least ten of the block kits, you can have a 30% discount on the kit, which works out to $38.85.   Just let us know if you would like to get one, and we can either set one aside for you To pick up, or we can mail it to you, 
however you decide to sew your blocks together, I am sure this year will see some gorgeous quilts! 


Tuesday, February 24, 2015

Block 12, Housetops

Block 12 is an old favorite of mine, Housetops:
this is the block, but not in the kit colors......

these are the colors in the Jo Morton kit, -- I only had enough of these colors at home to sew half of a block
and these are the colors in the Cotton and steel colorway,
this shows the block before it is cut into four smaller blocks.   I am keeping my options open for this one.  I might keep adding rounds to it and use it in the center of my quilt... who knows,   

Sunday, September 21, 2014

Sticks and Stones Show and Tell

On Saturday it was exciting to see all the sampler projects that people brought to show each other.  Last year's Sampler blocks used a colorway that included grays, taupes, browns and charcoal, as well as light colored neutrals.
 Karen used a lovely feather design fabric for the sashing, and sewed stars for between the blocks, and smaller blocks to use around the edge in the setting triangles for a beautiful allover look.
 I loved the cobblestone like borders and setting triangles on this one.
 It will be interesting to see what gets quilted in those alternate squares..
 This sampler from the batiks colorway from a couple of years ago had a stained glass look to it.
 Verna also brought her 30 block king size top using the topsy turvy setting,
 I was sorry to see it get folded up,
 This was the first totally finished project that we saw.  Dianne used a light colored border, and it was all-0ver quilted with Baptist fans,
 Another finished one!  Very impressive!
 Beautiful quilting, and done on a home sewing machine!
 This was the third totally finished quilt, and again, quilted on a home sewing machine,
 You need to see some closeups of the beautiful motifs in the setting triangles and outer borders,


 Sheila made her quilt pretty zingy with her fabric choice for the sashing and inner border-- that diagonal stripe is great,
 what a difference you can make just by the addition of a narrow little strip of fabric:
 Another gorgeous quilt that uses a light colored border.  (I might have to re-think my plan for using a dark border....)
 I love what she did with the arrangement of the sub-unit s in that square on the lower right...
 It was refreshing to see this black white and lime green quilt!  Love everything about it!
 She also had her sticks and stones quilt, using a two-sided sashing
 I like the way the blocks seem to float on the light background:
Thank you again to all of you who brought your projects.  I was inspired.

Saturday, August 30, 2014

Saturday Surprise Sampler starts soon!

We have a new round of our Saturday surprise sampler program starting in a week from today.
We had a lot of people wondering what the colors are going to be this year,
The fabrics we will be using are all from Andover. They include chambrays and fabrics designed by Jo Morton.   You can find out more about Jo Morton here. She often uses inspiration and patterns of prints from the 1800s.
this is the Charleston group,( photo from her website)
So this is a sneak peek at some of the upcoming combinations.
These aren't all of the fabrics but will add the others into the hoop display as they arrive in the store, most likely in September.
This is my chart of the fabrics.

To give the blocks a bit of a twist this year, I've decided to make them all repeating patterns reminiscent of the sort you might see on intricate tiled floors, 
photo from victorian tile restoration


each kit can be sewn into one twelve inch finished block, or left as four smaller blocks that finish at six inches.  This will give you lots more options for how you set the blocks!  I can't even imagine all the possibilities that people will come up with!


Hope you have fun sewing this year!


Thursday, June 12, 2014

Settings: Two Side Sashing

I will try to post some patterns to use for setting 12 inch finished blocks.

 It is not as simple as I thought it would be, because the images can't just be copied and pasted into the blogger template, but have to be uploaded separately. Plus, I can't figure out how to add in a table that I usually use for yardage and cutting instructions, so I will add that as a list, instead. 
At the store, we have a booklet available which I wrote some years ago, which contains 21 patterns.  Unfortunately I can't just upload all of those at once either, as the computer that 19 of them were stored on crashed a few years ago, so I would have to re-type them all. (And I have no clue which USB stick they were backed up on.)  Not to say that I wouldn't do that sometime, but not all at once.  

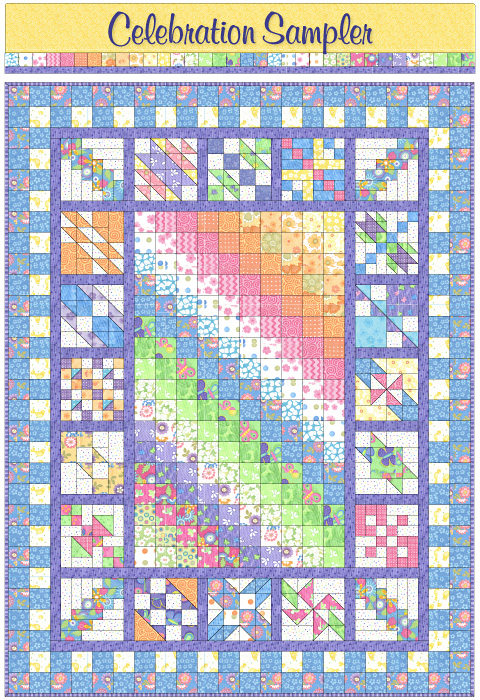
This is Setting number 20 from the booklet and has been very popular in previous years. 

 20. Two Side Sashing


a Setting Pattern for 12-Inch Blocks
uses 20 blocks
finished size is about 74" x 88"

a Periwinkle Pattern by Michelle Harris, 2012, free to print out and use for personal use

The sampler blocks are 12-1/2" with the seam allowances; they will finish at 12" when sewn into the quilt.

There are sashing strips only on  2 sides of the blocks.  When laid out to form the pattern, the blocks rotate back and forth.
(NB, This is a good pattern for when your sampler blocks have not all come out at the same size!  you could cut the sashings wider, and then trim them all to one size before you assemble them into the quilt top, thus absorbing the size differences from block to block)

Fabrics:
A.  Light Grey in the picture , used for Sashing for Blocks
            1.1m (44") 
                 Cut 2 strips, 15" by the wof,*
                  from these strips, sub-cut 20 rectangles,  3" x 15"

                 Cut 1 strip, 12-1/2" x wof
                  from this strip, and from the leftovers above, sub-cut 20 rectangles, 3" x 12-1/2"

B.  Inner Border Fabric (finishes at 1-1/2")
              .5m (18")  
                      Cut 8 strips, 2" x wof

C. Outer Border Fabric  (finishes at 6-1/2")
              1.5m (60")  
                       Cut 8 strips, 7" x wof

D.  Binding Fabric
              .7m (24")
                       Cut 9 strips, 2-1/2" x wof

*wof means the width of fabric from selvage to selvage, usually between 42" and 44"


Step One: Sew the Sashing rectangles to the sides of each block.  If there is any variation in the size of your blocks, now is the time to even them all up!
Measure them, and then trim them all to the same size, cutting the extra bits off of the sashing rectangles to keep the points on your sampler block intact.

Step Two: Lay out the 20 blocks into a 4 column, 5 row arrangement, referring to the diagram above  to see how to rotate the block.  You might want to shift the blocks around until you are pleased with the way that the colors balance out.

Sew the blocks into rows, and then sew the rows together.

Step Three: Add the borders.  To make the strips long enough, you will have to join the strips end to end and the cut the border to the size needed. 
When joining lengths, some people prefer to use a diagonal join .  To do that, just overlap the ends of the strips at a 90° angle ,and then sew from corner to corner.  Trim off the extra fabric and press. 
Cut the length of the borders as you go, because the length of them depends on the size of your central unit as it grows larger.

Using the narrow, 2" strips for the inner border, cut the two side borders to the same measurement as the height of your center unit.  Sew them to the sides and press seams out. 
Cut the top and bottom borders to the new width of the center unit and sew them on. 
Repeat this for the outer borders.

Step Four:
Layer the quilt with the batting and backing, and baste.  Quilt!

Step Five: Binding.  Trim away the extra batting and backing fabric.
This uses a double fold binding.
Sew the 2-1/2" strips of binding fabric end to end with 45° diagonal seams.  Trip away the extra fabric, and then press the strip in half lengthwise, with right side facing out, matching the raw edges.  Starting partway along one of the sides, stitch the raw edges of the binding to the top side of the quilt, folding the strip into a false iter at each corner.
 Turn the folded edge of binding to the back of the quilt and had stitch it into place.


Sunday, June 8, 2014

Blocks....and Samplers

Hello, Happy Sunday.   I am happy today because I am not as sick as I was for the past three days.  Now it has just turned into a regular cold. 
Being sick really slows a person down.
Right now we have a big rainstorm going on, so I'm also glad that I am safe and cozy inside.

It occurred to me that yesterday was Block 20 of the Saturday Surprise Sampler!  Time to think about settings! 
Okay, I realize that many of you think of this much earlier in the game, but I don't.  I like to get all my blocks made first, then think of all sorts of possibilites of what to do with them.  I also have my black and white blocks from last year!!  that's okay, I'll just need to think of more possibilities.

In preparation for all this thinking, I spent lots of time on Pinterest while I was sick (until it made my eyes hurt)
I made a special board where I pinned a bunch of images of quilts put together with sampler blocks,
click here to go to this bulliten board.  If you click on the image in the right way, it will take you to where it was originally posted so you can get more info on a quilt that you especially like. 

Also, don't forget that along the top edge of this blog, I have a couple of pages where there are lots of photos of what people have done in previous years with their sampler blocks:
click either on the page tabs, or you can click here, or here,

Many of these were based on the 21 patterns that we have available at the shop --- Setting Solutions,
I noticed when I was pinning the other images on Pinterest that there were some quilts I liked that featured an extra large block in the center, and the sampler blocks around it,
such as this one from Stichin Heaven,
found here
or this one,
found here

There are all sorts of ways you can vary a sashing strip between blocks,
 such as this storm at sea type sashing,
found here
or this one using scrappy triangles,
found here
and there are all sorts of good alternate blocks that you could use,
Well, you get the idea, - the possibilities are endless.  Part of the fun is the dreaming,

print friendly

Recent topics;